리사이클러뷰
아이템을 보이는 것만 만들고 스크롤 시 마다 뷰홀더를 이용해 다시 생성하는 뷰
주로 데이터를 스크롤 방식으로 뿌려주고자 할 때 사용한다.
예를 들어 유튜브의 스크롤 방식이나 인스타그램의 격자 형식의 여러 피드들을 나타낼 때도 사용하고 웬만한 서비스 앱에는 거의 필수적으로 들어가는 기능이다.
리사이클러뷰를 사용하기 위해 있어야 하는 것
뷰 홀더 → 뷰 객체를 계속 저장하고 있음
레이아웃 매니저 → 레이아웃 형태 지정 (Linear, Grid…)
어뎁터 → 아이템 뷰 객체 생성, 데이터 바인딩을 통해 연결
데이터 리스트 → 데이터 목록
리사이클러뷰 사용법
전체 소스 코드링크 : https://github.com/seungjunGong/Test-RecyclerView/tree/create/app/src/main/java/com/example/testrecyclerview/src/main
GitHub - seungjunGong/Test-RecyclerView: 리사이클러뷰 뽀개기
리사이클러뷰 뽀개기. Contribute to seungjunGong/Test-RecyclerView development by creating an account on GitHub.
github.com
1. 리사이클러 뷰를 추가하고 싶은 Fragment나 Activity에 추가한다.
orientation 지정 및, 레이아웃 매니저를 여기서 설정 할 수 있다.
Tip! tools:listitem 속성을 지정하면 화면에서 item리스트를 미리 볼 수 있다.
activity_main.xml
<?xml version="1.0" encoding="utf-8"?>
<androidx.constraintlayout.widget.ConstraintLayout xmlns:android="http://schemas.android.com/apk/res/android"
    xmlns:app="http://schemas.android.com/apk/res-auto"
    xmlns:tools="http://schemas.android.com/tools"
    android:layout_width="match_parent"
    android:layout_height="match_parent"
    tools:context=".src.main.MainActivity">

    <TextView
        android:id="@+id/main_tv_title"
        android:layout_width="wrap_content"
        android:layout_height="wrap_content"
        android:layout_marginTop="50dp"
        android:text="리사이클러뷰"
        android:textSize="30sp"
        app:layout_constraintEnd_toEndOf="parent"
        app:layout_constraintStart_toStartOf="parent"
        app:layout_constraintTop_toTopOf="parent" />

    <androidx.recyclerview.widget.RecyclerView
        android:id="@+id/rcv_goods"
        android:layout_width="match_parent"
        android:layout_height="wrap_content"
        android:orientation="vertical" <- 수직 방향으로 수정
        android:clipToPadding="false"
        android:paddingBottom="100dp"
        app:layoutManager="androidx.recyclerview.widget.LinearLayoutManager" <- Linear레이아웃으로 지정
        app:layout_constraintTop_toBottomOf="@id/main_tv_title"
        app:layout_constraintStart_toStartOf="parent"
        app:layout_constraintEnd_toEndOf="parent"/>

</androidx.constraintlayout.widget.ConstraintLayout>
2. 이미지, 텍스트와 같이 구성하고 싶은 레이아웃을 만들어 xml 파일에 저장한다. 해당 부분과 같이 레이아웃 파일에 item xml을 생성하여 한가지의 아이템만 구현한다.


다음과 같이 아이템뷰를 꾸며 주었다.
rcv_item.xml
<?xml version="1.0" encoding="utf-8"?>
<androidx.constraintlayout.widget.ConstraintLayout xmlns:android="http://schemas.android.com/apk/res/android"
    android:layout_width="match_parent"
    android:layout_height="wrap_content"
    xmlns:app="http://schemas.android.com/apk/res-auto"
    android:background="@color/white">

    <ImageView
        android:id="@+id/rcv_image"
        android:layout_width="wrap_content"
        android:layout_height="wrap_content"
        android:src="@drawable/ic_launcher_background"
        android:layout_margin="20dp"
        app:layout_constraintTop_toTopOf="parent"
        app:layout_constraintStart_toStartOf="parent"/>

    <TextView
        android:id="@+id/tv_title"
        android:layout_width="wrap_content"
        android:layout_height="wrap_content"
        android:layout_marginStart="20dp"
        android:text="리사이클러뷰"
        android:textColor="@color/black"
        android:textSize="24sp"
        android:textStyle="bold"
        app:layout_constraintBottom_toTopOf="@+id/tv_number"
        app:layout_constraintStart_toEndOf="@id/rcv_image"
        app:layout_constraintTop_toTopOf="@id/rcv_image" />

    <TextView
        android:id="@+id/tv_number"
        android:layout_width="wrap_content"
        android:layout_height="wrap_content"
        android:layout_marginStart="20dp"
        android:text="1번 입니다."
        android:textColor="@color/black"
        android:textSize="24sp"
        android:textStyle="bold"
        app:layout_constraintTop_toBottomOf="@id/tv_title"
        app:layout_constraintBottom_toBottomOf="@+id/rcv_image"
        app:layout_constraintStart_toEndOf="@id/rcv_image"
       />

    <View
        android:id="@+id/item_divider"
        android:layout_width="match_parent"
        android:layout_height="2dp"
        android:background="@color/black"
        android:layout_marginTop="20dp"
        app:layout_constraintTop_toBottomOf="@id/rcv_image"
        app:layout_constraintStart_toStartOf="parent"
        app:layout_constraintEnd_toEndOf="parent"/>

</androidx.constraintlayout.widget.ConstraintLayout>
3. 다음으로 아이템 뷰 객체에 들어갈 데이터 클래스에 리스트를 만들어 생성한다. 이미지는 Int 형으로 선언한다.
ItemsData.kt
package com.example.testrecyclerview.src.main.recyclerView

data class ItemsData(
    var Image: Int,
    var title: String,
    var number: String
)
4. 어댑터를 구현하고 Inner 클래스로 ViewHolder도 같이 구현한다. 어댑터는 데이터를 받고 이를 전달하는 부분을 구현하는 클래스이다. 만약 리사이클러뷰 의존성이 없다면 먼저 build.gradle의 Module 파일에 implementation 'androidx.recyclerview:recyclerview:1.1.0' 를 추가한다.
class RecyclerViewAdapter(private val itemsData: ArrayList<ItemsData>): RecyclerView.Adapter<RecyclerViewAdapter.ViewHolder>() {
}
다음과 같이 매개변수로 ArrayList로 선언한 데이터클래스를 넣어준다. 다음 빨간 아이콘을 눌러
onCreateViewHolder, onBindViewHolder, getItemCount를 implement를 통해 생성한다.

만약 implement가 잘 안되면 아래 코드를 보고 생성하면 된다.
RecyclerViewAdapter.kt
package com.example.testrecyclerview.src.main.recyclerView

import android.view.LayoutInflater
import android.view.ViewGroup
import androidx.recyclerview.widget.RecyclerView
import com.example.testrecyclerview.databinding.RcvItemBinding

class RecyclerViewAdapter(private val itemsData: ArrayList<ItemsData>): RecyclerView.Adapter<RecyclerViewAdapter.ViewHolder>() {
    // item xml을 받아와 홀더를 만들어준다.
    override fun onCreateViewHolder(parent: ViewGroup, viewType: Int): RecyclerViewAdapter.ViewHolder {
        val binding: RcvItemBinding = RcvItemBinding .inflate(LayoutInflater.from(parent.context), parent, false)
        // 아이템 레이아웃을 바인딩하여 연결 후 ViewHolder 클래스에 연결해준다.
        return ViewHolder(binding)
    }
    // 바인딩한 데이터를 홀더에 넣어준다.
    override fun onBindViewHolder(holder:  RecyclerViewAdapter.ViewHolder, position: Int) {
        holder.bind(itemsData[position])
    }

    override fun getItemCount(): Int = itemsData.size

    inner class ViewHolder(private val binding:  RcvItemBinding): RecyclerView.ViewHolder(binding.root){
        fun bind(data: ItemsData){
						// 아이템 레이아웃에서 정한 값들을 데이터클래스 값으로 넣어줌
        }
    }
}
ViewHolder는 따로 클래스를 생성해 할 수 있지만 간단히 inner 클래스로 생성하여 값을 전달하였다. 아이템 레이아웃 객체를 즉 뷰 객체를 매개변수로 지정해야한다. 그리고 뷰홀더를 상속받을때 binding.root 값을
받는다. ViewHolder 클래스에 데이터클래스에서 정의한 값들을 레이아웃에 맞게 지정하여 값을 넣어준다.
inner class ViewHolder(private val binding:  RcvItemBinding): RecyclerView.ViewHolder(binding.root){
    fun bind(data: ItemsData){
        // 아이템 레이아웃에서 정한 값들을 데이터클래스 값으로 넣어줌
        binding.rcvImage.setImageResource(data.Image)
        binding.tvTitle.text= data.title
        binding.tvNumber.text= data.number
    }
}
5. 리사이클러뷰에 어댑터 연결 및 레이아웃 매니저를 추가해 레이아웃을 지정한다.(xml상에서 추가가능) 처음에 구성하였던 레이아웃의 액티비티로 가서 리사이클러뷰와 리사이클러뷰 어댑터를 연결하고 데이터클래스에 원하는 값을 전달하여준다. 어댑터에 데이터값을 넣은 것을 지정해 넘겨준다. 데이터는 apply 등을 이용해 add 메소드로 데이터를 추가 해 줄 수 있다.
MainActivity.kt
var itemsData = ArrayList<ItemsData>()
var i = 1
itemsData.apply{
add(ItemsData(R.drawable.ic_launcher_foreground, "리사이클러뷰", "$i 번입니다."))
    i++
    add(ItemsData(R.drawable.ic_launcher_background, "리사이클러뷰", "$i 번입니다."))
    i++
    add(ItemsData(R.drawable.ic_launcher_foreground, "리사이클러뷰", "$i 번입니다."))
    i++
    add(ItemsData(R.drawable.ic_launcher_background, "리사이클러뷰", "$i 번입니다."))
    i++
    add(ItemsData(R.drawable.ic_launcher_foreground, "리사이클러뷰", "$i 번입니다."))
    i++
    add(ItemsData(R.drawable.ic_launcher_background, "리사이클러뷰", "$i 번입니다."))
    i++
    add(ItemsData(R.drawable.ic_launcher_foreground, "리사이클러뷰", "$i 번입니다."))
    i++
}

val recyclerViewAdapter = RecyclerViewAdapter(itemsData)
binding.rcvGoods.adapter= recyclerViewAdapter
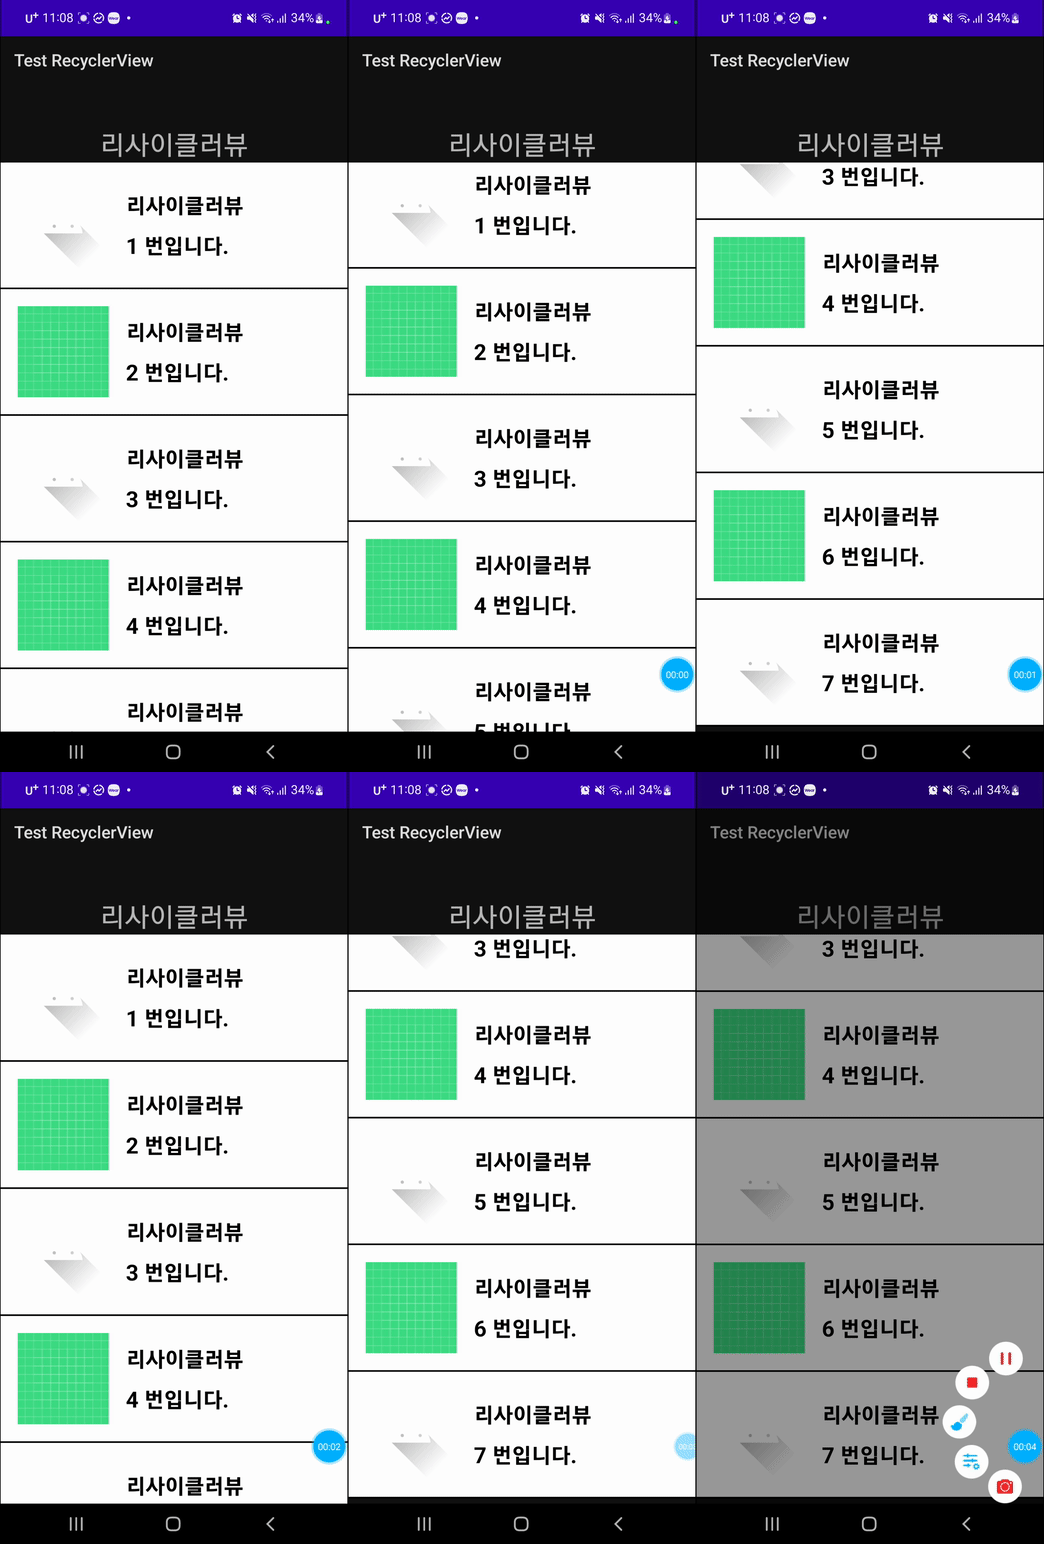
구현화면

어댑터 정리
어댑터
inner class ViewHolder → 아이템 xml 바인딩 값을 매개변수로 받아와 bind 함수를 만들어 데이터를 넣어준다. 이때 arrayList의 position 값을 onbindViewHolder 에서 받는다.
onCreateViewHolder → 뷰홀더를 생성할 때 호출되는 함수, 아이템 뷰 객체를 만들고 뷰홀더에 전달함
onBindViewHolder → viewHolder와 position(뷰의 인덱스 id)을 받아옴
미리 만들어둔 arrayList의 postion을 바인딩 한 값을 뷰 홀더에 넣어줌
또한 postion 값을 가지고 있기 때문에 clicklistener 함수는 여기에서 작성하는 것이 편하다.
액티비티나 프레그먼트와 달리 click interface를 따로 정의 해서 사용해야한다.
따라서 외부에서 리스너 객체를 어댑터에 전달 받아 저장해야한다. → 함수 및 변수 선언 필요
이후 메인 실행 장소에서 리스너 객체를 해당 함수에 넣어주면된다.
리스너 함수 구현 정리된 자료 링크 https://yunaaaas.tistory.com/57
[Android/Kotlin] RecyclerView 클릭 이벤트 적용하기
RecyclerView 첫번째 시리즈에 이어 두번째 시리즈인 클릭 리스너를 추가하여 리사이클러뷰 아이템에 각각 클릭 이벤트를 적용하는 방법에 대해 적어보려고 합니다 : ) RecyclerView 만드는 방법에 대
yunaaaas.tistory.com
'android' 카테고리의 다른 글
| Android - 리사이클러뷰 뽀개기(2) - 리사이클러뷰 아이템 클릭이벤트, CRUD (0) | 2022.10.27 |
|---|---|
| Android - Coroutine(코루틴) (0) | 2022.10.15 |
| Android Manifest 와 4대 컴포넌트 (0) | 2022.10.02 |
| Kotlin 추상화 & 상속 (1) | 2022.09.08 |

